Pages

Friday, July 22, 2011

The Simple Pleasures of a Child


Who would have thought with all the gadgets and toys a child could want that something as simple as a band-aid would make a child happy. Using coupons, we are able to get cute character band-aids very reasonably priced and sometimes free. This makes our two little girls extremely happy!

We were helping my mother move and Eryn (the little one) fell walking on the sidewalk and skinned her knee. No it wasn't life threatening and didn't even cause her to cry. When we got home she told me she had a boo boo and needed a band-aid to fix it. I told her I'd get her a Barbie band-aid and life was grand. She then danced around the house singing that she had a Barbie band-aid and look at her.

Isn't the life of a 3 year old grand? I LOVE that character Band-aids are something that can cause my children joy.

Thursday, July 7, 2011

Adventures in Dying... An Ikea Klippan Loveseat VS. ME

We purchased an IKEA Klippan loveseat with no cover on Craigslist last month. I did not or was not able to see the legs in the original Craigslist post so I was more than a little shocked to see hideous wooden legs put on the sleek, modern sofa. As you can imagine, they were removed.
Ikea is over an hour and 1/2 away from us so it took us two weeks to head to my favorite store (in competition with Target).  I unknowingly, thought I could purchase Klippan metal legs at the store and an extra cover. My idea was to buy an off-white cover (for $19) and dye it gray.  I had seen a dye job to die for at IKEA Hackers and knew I could do it.

I was unable to find metal legs at IKEA for the sofa but we did purchase these bookcase legs that are super similar in size, form and color so we thought... for $10 sure... we'll try it.
I realized after pulling the wooden legs off that the original owners put them on because one place where the metal legs screw in was crooked. They took a new screw and screwed in the wooden legs just to the outside of the original leg position.

We unscrewed the extra screws and I fixed the crooked spot by inserting a screwdriver inside it and pulling in the right direction. DUH! Super easy!

The couch was also a very old version. The date on the bottom said 1999.  We had to cut off a white gauzy cover to put the slip cover on but no worries.. It turned out fine! The kitten even got into the DIY spirit.
The wooden legs made the couch too high and therefore oddly uncomfortable. It wasn't until we put these legs on and the couch sat lower that we realized that was the problem the whole time. 

Next came the dye job. I found on the RIT website where you can dye items in your washer. We purchased 2 Royal Blue and 1 Sunshine Orange liquid dyes to mix together to get a blue/gray. We pre-washed the off-white cover and then mixed our colors together. 

You can actually pick out over 500 colors at the Color Formula Guide .
We picked out #193 and followed the directions. 

The directions state to only leave it in the dye for 30 minutes max and use super hot water. You are also to add 1 cup of salt into the tub. I stopped the washer at 30 minutes and then rinsed a second time.
After round 1 it came out WAY too blue!
I'm not sure the orange did anything at all. I re-read the directions for machine washing and the only thing I can think of that went wrong is that we have an HE front loader so it uses less water. 

We purchased a black RIT dye and poured the entire bottle in the load and tried to darken it thinking any gray/black would be better than denim blue.

It didn't do anything. When I have time I will use two bottles of black and hope it darkens it. For now, we have a denim blue couch. We go back to IKEA on Saturday to purchase the Klippan 4 seater in black and a few extra off-white covers for me to dye.  With my daughter's birthday party on Sunday I will be purchasing a pink cover for the 2 seater.

New living room/ kitchen makeover pictures to follow. Next time I try to color match and dye a cover I will use 1/2 of the recipe and use a large Rubbermaid container and boiling water instead of our washer. It was a super easy method but lack of extra water darkened the color drastically.

Tuesday, July 5, 2011

Let there be light.... without rust

We have had the same outdoor lights since we moved in over 5 years ago.They are also original to the house which was built in 1994 of 1995 (we're not sure).  That means the lights are way too old to still look good. Plus I just didn't like the design and the fact that over 50% of the houses in our development still had them as well.

I picked out a great light two pack at Lowe's for only $31. We purchased 2 packs and got to work.

Problem #1: the hanging bracket pushed the light too far out that it was not flush.

Problem #2: because we have brick the electrical boxes were hung sideways which gave us no room to adjust the adjustable screws to bring the light closer to the brick.

Solution: After fighting with one of the lights by the front door for an hour I called my brother. He can jerry-rig almost anything. So... he used part of the bracket from the old light and put a screw in one way and the two mounting screws in the other way. We used nuts to hold the screw in the right place and rigid so the light had something to hold on to.


Final Product: After an hour or more we had two of the four lights up. We purchased more nuts and screws at Lowes to fully secure the remaining two lights (which are still not up because I am rapidly and frantically trying to finish the kitchen)

Tuesday, June 28, 2011

4th of July Jello Dessert


Jello recently had an advertisement where you could get a flag Jello mold for only $3 and they would send it to you before Memorial Day. My step-dad's birthday is also right around memorial day as is our anniversary. We had Lou's birthday celebration on Memorial Day Monday and I made the Jello flag mold dessert. The recipe was found on the mold but if you didn't get a chance to get the mold here is the recipe. You can use this in any silicone mold or put this in a regular glass dish and use any colors of Jello you desire.

You will need:
1 qt (4 cups) boiling water, divided
2 pkg (3 oz. each) Jell-O Berry Blue Flavor Gelatin
2 pkg (3 oz. each) Jell-O Gelatin, any flavor red
3 cup cold water, divided
1 pkg (3 oz.) Jell-O Lemon Flavor Gelatin
1 tub (8 oz.) COOL WHIP Whipped Topping, thawed

To make it:

Add 1 1/2 cups boiling water to blue gelatin mix in medium bowl; stir 2 min. until completely dissolved. Repeat in separate bowl with red gelatin. Stir 1 1/2 cups cold water into gelatin in each bowl.

Spray 10 cup flag mold (or 9x11 silicon dish) with cooking spray; place on baking sheet. Pour red gelatin into mold. Refrigerate 45 min. until set but not firm. Meanwhile, refrigerate blue gelatin 45 min. After 20 min., dissolve lemon gelatin in boiling water in separate bowl.  Refrigerate 25 min. or until slightly thickened.

Whisk cool whip into lemon gelatin; spread over red gelatin layer in mold. Refrigerate 10 min. or until set but not firm. Cover with blue gelatin. Refrigerate 4 hours or until firm. Unmold. Use fresh fruit and additional cool whip to decorate mold to resemble a flag.


*Here is where I went wrong. I used the canned whip cream to decorate the top and since it is all natural it melted shortly after I took my pictures. What you see is pretty now but 5 minutes later at my mom's house and it ran all over the plate I had decorated it on. I used the canned cream because I thought it would be easier and quicker to pipe the stripes. Next time I will use Cool Whip and put it in a bag and pipe it on or spread it on with a knife. Sometimes it doesn't pay to take short cuts.

This dessert is really good and was gone in a blink!

Saturday, June 11, 2011

Ikea Kura Hack: Our New Apple Tower

My 3 year old is obsessed with apples. She has a pair of 12 month Carter's pajamas that she still wears around the house even though they are skin tight because she must have her "apple jammies".  When we found apple fabric a Joann's a few months ago we had to get some. I had originally decided to make her a jumper with it so she might retire those jamies but alas I ran out of time and just hadn't done it.

In the search for a new couch she was sitting on my lap while I browsed Ikea's website and saw a Kura loft bed. She was instantly in love with the bed but alas I wasn't in love with the $199 price tag. I searched on Craigslist and found one that was an hour away from our house and only $50.  The kicker? We had to take it apart.  After an hour and a half taking it apart we went home. It took me all evening to completely put it back together but it is now the perfect apple tower!

What  I ended up doing was covering all the blue/white panels with fabric.

1. Before sliding panels lay the panel on top of fabric and cut fabric leaving 1/2 to an inch of fabric overhand.

2. Put double sided tape (any kind) on the side of the panel you do not wish covered. We put the tape on the white side so the blue panel was completely covered.

3. After the entire panel is covered, slide into place and continue assembling the bed as directed.


I had a little help from the princess who wanted to "measure" to make sure it all fit.


Note: I stopped each time a panel was to be slid into place to wrap the panel in fabric and then continue. We still have some fabric left so we aren't sure if a small curtain for the bottom is to be made or if we'll just make her an extra pillow for on top of the bed.

This can easily be undone if you take the bed apart and switch out with different fabric.

For now, the apple princess can use her apple tower any way she pleases. It took us a day to teach her how to go up and down the ladder and now she's a pro.


Saturday, June 4, 2011

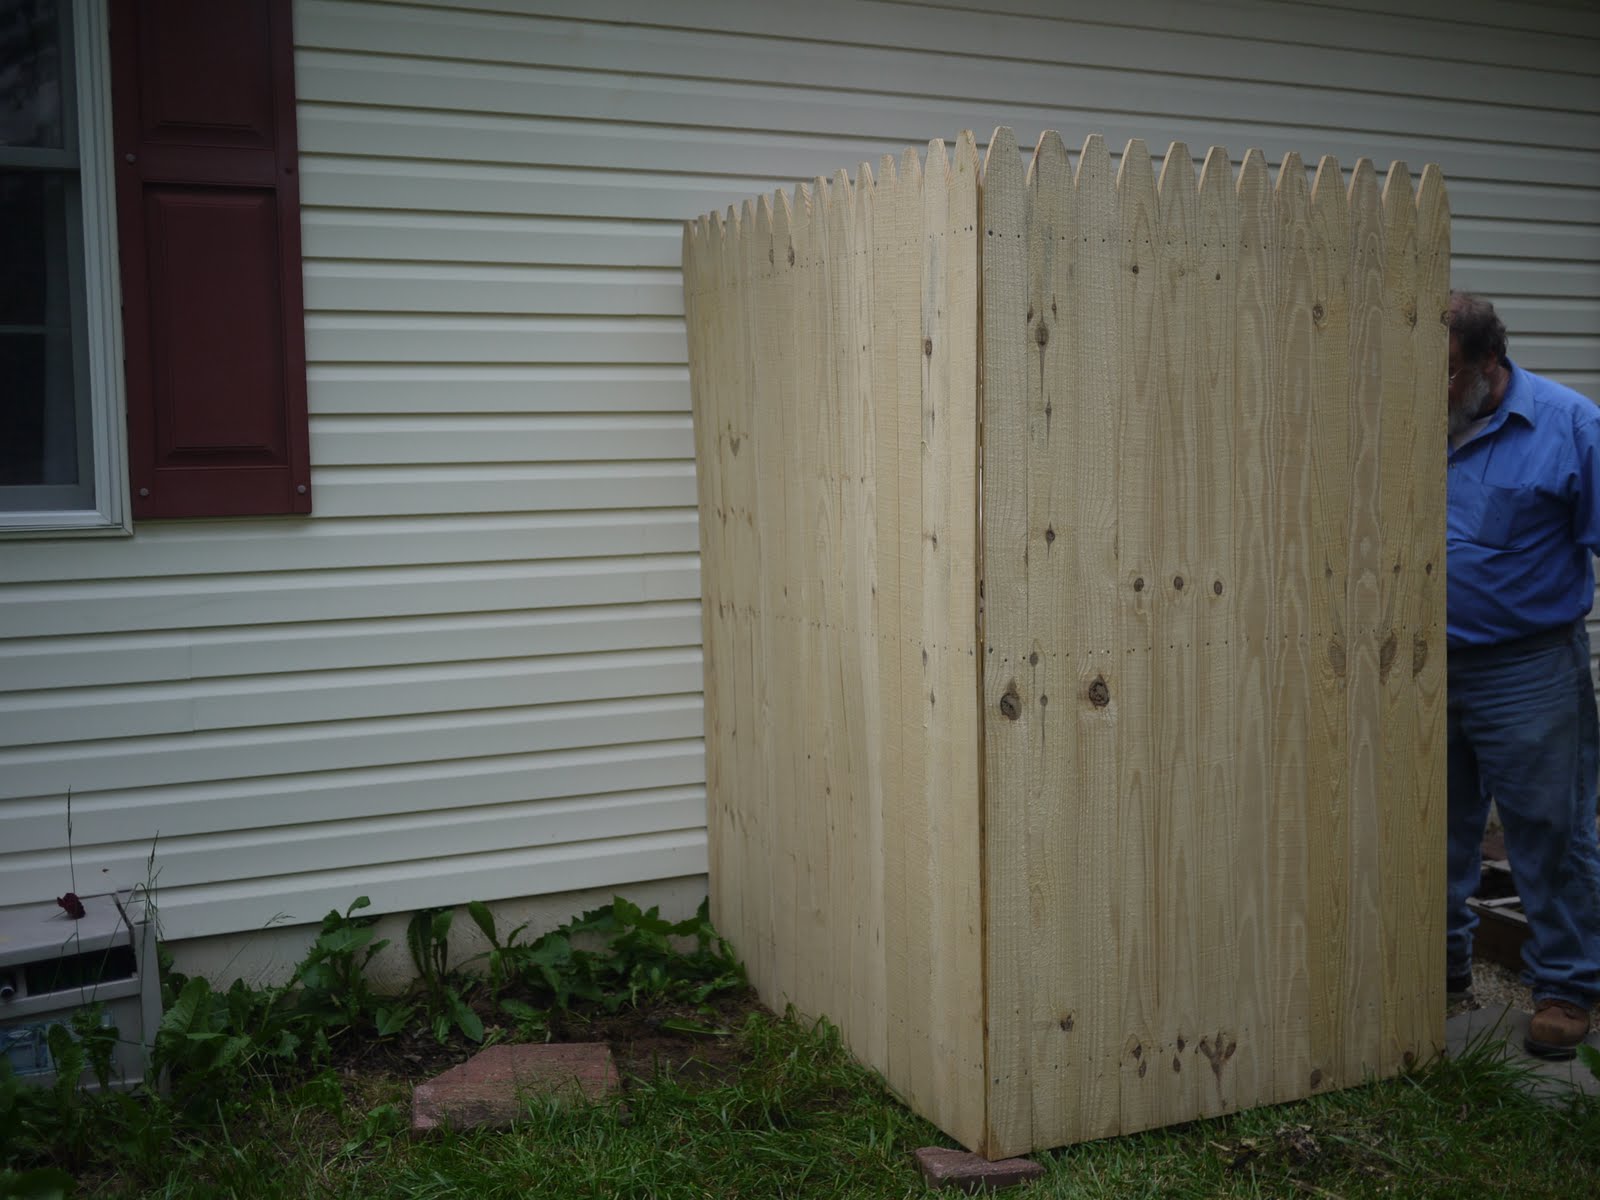
Cover Up That Gas! Building a Propane Tank Hide Away Cover

 Our homeowner's association has some very strict rules for things including but not limited to:
1. only a 4 foot fence can surround your house.
2. NO sheds of any kind
3. Any major structural changes must be approved by the architectural committee
4. All mailboxes must be the same
5. Any propane tanks must covered from street view
6. NO above ground pools
7. NO large playsets


The list goes on and on and only a few things are actually enforced at all. The mailbox thing I don't think anyone has EVER followed but when we got a propane tank 2 days before Christmas I knew it would eventually get covered. Why? Because I'm such a stickler for the rules? NOPE! Because the darn thing is hideous!
As you can tell we've been so very diligent in weeding around it. Mostly because I was scared to death that if the weed eater hit it our house would explode. I'm a little dramatic at times.

We purchased:

1 6x8 foot piece of fencing from Lowes $24.98
1 4-pack of L brackets from Walmart $1.98

We used my father-in-law's truck and saw to bring the large piece home and then saw it into 2 pieces. The pieces were 5 feet and 3 feet. We wanted to make sure it was long enough to cover the tank but didn't stick out so far into the yard.


 Next, the metal L brackets were installed along the long support pieces of wood (3).

Then, the two pieces were held together by my husband and I while my father-in-law secured the L brackets together and reinforced with 2 inch drywall screws (I had them in my garage so they were essentially free for this project)


We then lifted the entire thing up to the propane tank and used old patio pavers to ensure it was level since our yard slightly slopes.
It has not been been attached to the house yet since I want to paint/ stain it first. But here is the finished building project. The weeds have since been pulled out.  The backyard hose is directly next to the propane tank (on the left) so we need to cut a small hole in the cover to hook up the hose. 


The hose on the left in the plastic housing will be moved up against the propane cover once the hole is drilled but for now our propane tank is covered and it gives me a blank canvas for our backyard for only $30!

Tuesday, May 24, 2011

Summer Yard Plan 2011 and the current mess it is in

Our yard is currently yucky! We bought our house 5 years ago and it looked alright as far as landscaping goes. However, there were some issues. For example, all the shrubs and plants were planted smack dab against the house so as they grew they pushed outward and hung over the mulch. We had to pull up a butterfly bush that was massively overgrown and over the 5 years we've lived here perennials have died and some of the bushes have also thinned and become scraggly.

Last year we mulched with some recycled mulch from the local recycling plant and planted some tulips and mums. This year only two mums came back up (out of 5 ugghhhh.... The tulips we planted too far apart and they just looked sad. Another two shrubs died completely and so now we are left with this.
 
The overgrown grass is where I have left it for a week and a half so we can widen our flower beds. They are very narrow right now so we are using a shovel and digging up the grass. It is very slow work. It doesn't help that it has rained almost every day for the last two weeks either.


 Here are some of the plants we currently have in our flower beds. This is an overgrown rose bush that I hack at every year and it keeps coming back even bigger!
This is a black eyed susan I got from my cousin's house after he died. My mother dug up two and gave me one when we moved into this house. He died of cancer two weeks after our oldest child was born. It is planted directly below her bedroom window.

This next one is a raspberry bush my husband and I planted last year. I know it is currently out front but it will be moved to the back inside a large planter when I move things around. It was just a stick last year so this is great progress!
This beautiful climbing vine I can't remember what it is called, but I planted one three years ago and it keeps coming up!
Here is the progress so far. We've left the grass grow in the area we want dug up and I have started digging. It has been extremely slow progress especially since we are also working on the kitchen and other things at the same time.
The picture does not do my hard work justice. This is actually about a 3 1/2 to 4 foot stretch but I took the picture from the porch so it looks a little wonky. Don't want to miss credit for my work! :o)

Here is the general plan for our yard this year. We have already accomplished the covering for the propane tank and I'll tell you about that later.

LinkWithin

Related Posts Plugin for WordPress, Blogger...