Showing posts with label Recipe. Show all posts
Thursday, March 1, 2012
Homemade Cream Chese Wontons
We are trying to eat more plant based at our house. I know cream cheese is not at all plant based but we had not yet made wontons so we wanted to try a fairly simple recipe first. The verdict? We LOVE them!
Step 1: Buy your ingredients:
1 8 oz. package cream cheese
1 small package of green onions (green parts chopped)
1 package wonton wrappers
1 small bowl of water
2 cups of oil (we used 1/2 veg and 1/2 olive)
1 small pot to fry
Step 1: combine cream cheese and green onions.
Step 2: lay out wontons and fill each with 1/2 tablespoon of cream cheese mixture.
Step 3: Fold wontons into halves. We experimented with the envelope shape but I didn't like how they fried so we stuck with just folding them in half.
Step 4: Fry in the heated oil for about 30 seconds on each side and drain on a paper towel.
Step 5: EAT!
Labels:
Family,
Handmade,
Real Life,
Recipe,
Vegetarian
Monday, February 20, 2012
Pinterest Challenge: Ice Cube Lunch Trays
My children were off of school today but alas, as the teacher I was not. While my mother in law got to stay with my two adorable girls I was working. To celebrate a day where both girls can stay home together I decided to complete a Pinterest Challenge I had been dying to try. I found this great picture of a toddler lunch idea.
.
So I make my own for both of my girls. Now, our tray was a little bigger but both girls just loved it. Here is my interpretation of what I called a Rainbow Lunch Tray.
From left to right is as follows: 1/2 slice of American cheese, mix of chocolate and white chips, 3 sections of purple seedless grapes, 1/2 filled container of ranch dressing, two containers of brocolli, 1 container with 6 mini carrots, 1 container with cheese cracker birdies (Target brand), 2 containers full of animal crackers (about 6-8 animal crackers total), two sections of blue jello roll up (another Pinterest find) and two sections of strawberries (about 2 large strawberries).
My oldest who doesn't usually like raw veggies devoured her plate while my youngest didn't eat all of her veggies but everything else was gone. I think this may be a snow day/ day off from school/ fun Saturday tradition around here. Long live a $2.00 ice cube tray!
.So I make my own for both of my girls. Now, our tray was a little bigger but both girls just loved it. Here is my interpretation of what I called a Rainbow Lunch Tray.
From left to right is as follows: 1/2 slice of American cheese, mix of chocolate and white chips, 3 sections of purple seedless grapes, 1/2 filled container of ranch dressing, two containers of brocolli, 1 container with 6 mini carrots, 1 container with cheese cracker birdies (Target brand), 2 containers full of animal crackers (about 6-8 animal crackers total), two sections of blue jello roll up (another Pinterest find) and two sections of strawberries (about 2 large strawberries).
My oldest who doesn't usually like raw veggies devoured her plate while my youngest didn't eat all of her veggies but everything else was gone. I think this may be a snow day/ day off from school/ fun Saturday tradition around here. Long live a $2.00 ice cube tray!
Thursday, January 26, 2012
Bible Cake for Pastor's Birthday
My grandfather's 84th birthday was yesterday. We had a fabulous church service last night in honor of him and took a 50 question quiz on how well you know your pastor. I only missed 9 which isn't bad since he is also my grandfather.
I made this cake last year for his 83rd birthday and found the pictures today when I began making our 2011 year in pictures book. I also realized that I never shared this awesome cake on the blog. And so... today's post was born.
I began by making a large yellow cake in two rectangular pans. I cut the edges so they would form more of a page look and slid them together on my cake stand.
I made some great homemade chocolate icing and put a layer of coconut beneath it. My grandfather loves German sweet chocolate cake so I pulled a little coconut influence from that.
I made this cake last year for his 83rd birthday and found the pictures today when I began making our 2011 year in pictures book. I also realized that I never shared this awesome cake on the blog. And so... today's post was born.
I began by making a large yellow cake in two rectangular pans. I cut the edges so they would form more of a page look and slid them together on my cake stand.
I made some great homemade chocolate icing and put a layer of coconut beneath it. My grandfather loves German sweet chocolate cake so I pulled a little coconut influence from that.
I covered the entire thing in white fondant and began painting. I took gel food coloring in ivory and gold and brushed the entire surface. I then created edges to resemble a book and painted a darker tone.
Do you just love how I steal my child's plastic plate as a palette? Me too!
I added a good Bible verse my grandfather likes and some leaf and ribbon detailing. I also purchased a plain white gumpaste cross from the local cake supply store and painted it up. Somehow I got so wrapped up that I totally forgot to take pictures of the process.
I covered the entire cake in gold luster dust to give it a little extra sheen. This picture was taken in my fridge after I finished the cake.
Happy Birthday Grandpa! May you have many many more!
Saturday, January 21, 2012
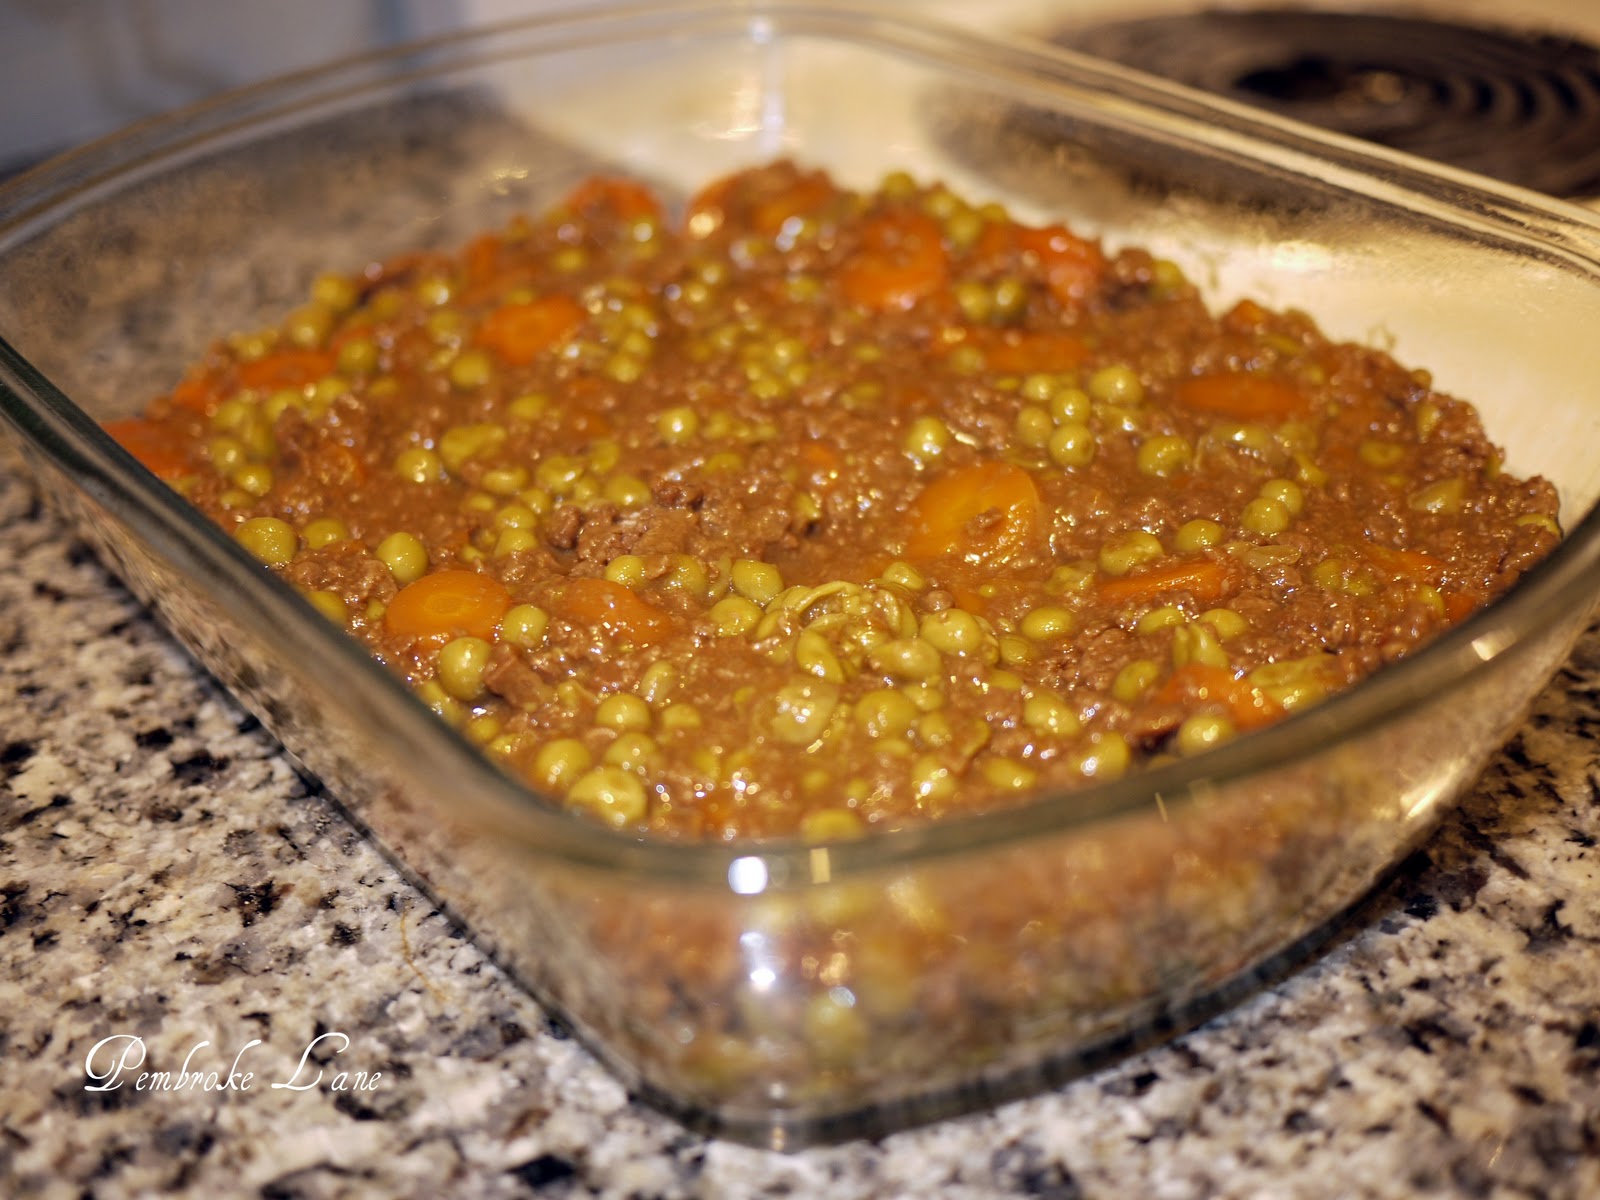
Vegetarian Shepherd's Pie with Boca Soy Crumbles
My family and I watched a great documentary called "Vegucated" and I honestly wanted to cry. A few times I did in fact cry and so did my 2nd grade daughter who insisted on watching with me. I had long known that animals were killed for food, what person doesn't? But what I didn't know was just how cruelly animals were kept and treated.
I began my journey into "vegetarianism" by listening to my own body. I have horrible energy swings, headaches, feel tired and groggy, get tummy troubles, etc. I seem to have issues with lots of foods. What food was it? Who knows? I know that I couldn't sleep at night all night because I couldn't breathe. Was it my allergies? Maybe. I do have two dogs and two cats but getting rid of them was not an option. I love my animals but I also love to breathe. I had read that dairy causes more mucus production so I thought maybe getting rid of dairy would help my breathing issues at night. Can I give up milk and yogurt? Sure! Can I give up cheese? Maybe not. Cheese is a staple in my home and is used multiple times a week for a majority of meals.
My husband and youngest daughter are total meat eaters. My youngest LOVES her chicken nuggets and will eat meat over anything else. My husband looked at me when I said I wanted us to give up meat and flat out said "no". I am slowly convincing him by switching out our meat for soy substitutes for 2-3 meals a week. We still have some beef and pork in the freezer to use up and it would be horrible to throw it away especially since the animal's life has already been forfeit but I have purchased Boca and Morningstar Farms products and soy milk to get us started. Believe it or not, the youngest meat eater LOVES her 25% less sugar Westsoy Plus Plain soy milk! She asked for it twice today and she NEVER asks to drink milk. Yeah!
This recipe I found at Peta's website in their pdf version of the "getting started" Vegetarian information packet.
I mixed together:
1 can of peas
1 can of carrots
1 packet of gravy (made to serve)
1 bag of Boca Soy Crumbles
and spread into a sprayed glass dish
Wash, peel, and boil for 20 minutes 4-6 medium potatoes.
Mash with 1/2 cup of soy or regular milk
2 Tb of margarine or real butter
Salt & Pepper to taste
1 tsp Garlic Salt
Spread on top of mixture and bake at 350 degrees for 20-30 minutes until potatoes are slightly brown.
*This recipe differs slightly from the PETA recipe as I doubled the amount of veggies and added two potatoes.
Of course mine does not look nearly as pretty as PETA's version as I believe I pulverized my potatoes but my family still ate it and my husband even went back for seconds! I also had a little gravy sneak out on the side (bad gravy).
Tuesday, June 28, 2011
4th of July Jello Dessert
Jello recently had an advertisement where you could get a flag Jello mold for only $3 and they would send it to you before Memorial Day. My step-dad's birthday is also right around memorial day as is our anniversary. We had Lou's birthday celebration on Memorial Day Monday and I made the Jello flag mold dessert. The recipe was found on the mold but if you didn't get a chance to get the mold here is the recipe. You can use this in any silicone mold or put this in a regular glass dish and use any colors of Jello you desire.
You will need:
1 qt (4 cups) boiling water, divided
2 pkg (3 oz. each) Jell-O Berry Blue Flavor Gelatin
2 pkg (3 oz. each) Jell-O Gelatin, any flavor red
3 cup cold water, divided
1 pkg (3 oz.) Jell-O Lemon Flavor Gelatin
1 tub (8 oz.) COOL WHIP Whipped Topping, thawed
To make it:
Add 1 1/2 cups boiling water to blue gelatin mix in medium bowl; stir 2 min. until completely dissolved. Repeat in separate bowl with red gelatin. Stir 1 1/2 cups cold water into gelatin in each bowl.
Spray 10 cup flag mold (or 9x11 silicon dish) with cooking spray; place on baking sheet. Pour red gelatin into mold. Refrigerate 45 min. until set but not firm. Meanwhile, refrigerate blue gelatin 45 min. After 20 min., dissolve lemon gelatin in boiling water in separate bowl. Refrigerate 25 min. or until slightly thickened.
Whisk cool whip into lemon gelatin; spread over red gelatin layer in mold. Refrigerate 10 min. or until set but not firm. Cover with blue gelatin. Refrigerate 4 hours or until firm. Unmold. Use fresh fruit and additional cool whip to decorate mold to resemble a flag.
*Here is where I went wrong. I used the canned whip cream to decorate the top and since it is all natural it melted shortly after I took my pictures. What you see is pretty now but 5 minutes later at my mom's house and it ran all over the plate I had decorated it on. I used the canned cream because I thought it would be easier and quicker to pipe the stripes. Next time I will use Cool Whip and put it in a bag and pipe it on or spread it on with a knife. Sometimes it doesn't pay to take short cuts.
This dessert is really good and was gone in a blink!
Friday, April 29, 2011
Easy Preservative Free Home Made Chicken and Rice Soup
My family loves this soup so much I've made a huge batch twice this month!
3 cups of shredded cooked chicken
2 cups of dry rice
3 cups of water
1 large box of low sodium chicken broth
3 tablespoons parsley
3-4 large carrots chopped
3-4 large stalks of celery chopped
1. Cook rice in 3 cups of boiling water. We use minute rice.
2. Do not drain rice but add 1 large box of low sodium chicken broth.
3. Add cooked chicken, chopped carrots and celery.
4. Add parsley, salt, pepper and any other seasoning to taste. We just add parsley, salt and pepper.
5. Cook on medium for 10-15 minutes until carrots and celery are tender.
6. Take off heat and serve.
This makes 4-5 huge bowls of it. If you let it sit for a while it will turn into more of a chowder as the rice will absorb more of the liquid. You can add more water or chicken broth in the beginning of the recipe if you want more broth.
*I took this picture the next afternoon when I reheated it for lunch. The original batch was much more "soupier". You do not need to add extra chicken broth or water if you eat this right away.
Tuesday, April 5, 2011
Johnsonville Sausage Pasta Bake #SSJohnsonville
This great recipe is something that I just came up with but my family LOVED it so I thought I'd share.
Sausage Pasta Bake Recipe
1 small box of penne pasta
1 package (5 links) Johnsonville Mild Italian Sausage
1 jar spaghetti sauce
2 cups Italian shredded cheese
1. remove sausage from casings and brown in a pan.
2. Spray a large pan with cooking spray and set aside.
3. Boil water and cook penne pasta until al dente.
4. Spread a thin layer of spaghetti sauce on the bottom of the pan.
5. spread a layer of sausage then pasta then cheese. We kept 1/2 sausage free because my oldest daughter has problems stomaching any type of spicy seasoning and she requested no sausage.
6. repeat until all pasta, cheese and sausage is gone.
7. Top with more cheese! Add as much as you like.
8. Bake in a 350 degree oven about 20 minutes or until the cheese is melted throughout. Serve and enjoy!
Disclaimer: I was sent coupons for Johnsonville sausages. They in no way swayed my review but did give me the product for free in exchange for an honest review.
Monday, March 21, 2011
My Philadelphia Cooking Creme House Party + Enchillada Recipe
I love House Party! They are an amazing website where you can get wonderful name brand products just coming out and have a party with them! We've done several House Party's and just love doing each one.
This particular House Party was the Philadelphia Cooking Creme House Party. We were sent an amazing pan from Green Pan, coupons for 4 FREE Philadelphia Cooking Cremes, coupons for $1.50 off, wooden spoons, magnets, and notepads for our guests. We also received a cute pot holder.
For our party we made two different dishes. One was a chicken, pasta, tomato dish where we used the regular (original) flavor.
The other dish was chicken enchiladas and we used the recipe on the side of the Santa Fe Blend. For this recipe we used:
1 container of Philadelphia Cooking Creme Santa Fe Blend
The rest of the chicken in the bag in our freezer :o) Or you could use 1 to 1 1/2lbs of chicken
1 cup of onions chopped (we had onions in the freezer I had chopped and frozen earlier in the year)
Here is our awesome GREEN PAN! I am in LOVE!
1 14 oz. can of diced tomatoes
Cook chicken thoroughly and shred. We baked it first.
Put onions and tomatoes into pan and cook down (about 5-10 minutes on medium)
Add 3/4 of container of Philadelphia Cooking Creme Santa Fe Blend
Add 1/2 cup of shredded Mexican blend shredded cheese
Mix in shredded chicken
Spoon a small amount of mixture in a 6 inch tortilla (we used 8 inch ones just because)
Wrap and put the folded side down onto a baking dish
Continue until baking dish is full or all of the mixture is gone (we ended up making eight 8 inch tortillas full)
Spread remaining 1/4 of container of Philadelphia Cooking Creme Santa Fe Blend on top
Sprinkle a little cheese.
Place in a 350 degree preheated oven until warmed through and cheese is melted (20 minutes for us)
Then EAT!!!
This particular House Party was the Philadelphia Cooking Creme House Party. We were sent an amazing pan from Green Pan, coupons for 4 FREE Philadelphia Cooking Cremes, coupons for $1.50 off, wooden spoons, magnets, and notepads for our guests. We also received a cute pot holder.
For our party we made two different dishes. One was a chicken, pasta, tomato dish where we used the regular (original) flavor.
The other dish was chicken enchiladas and we used the recipe on the side of the Santa Fe Blend. For this recipe we used:
1 container of Philadelphia Cooking Creme Santa Fe Blend
The rest of the chicken in the bag in our freezer :o) Or you could use 1 to 1 1/2lbs of chicken
1 cup of onions chopped (we had onions in the freezer I had chopped and frozen earlier in the year)
Here is our awesome GREEN PAN! I am in LOVE!
1 14 oz. can of diced tomatoes
Cook chicken thoroughly and shred. We baked it first.
Put onions and tomatoes into pan and cook down (about 5-10 minutes on medium)
Add 3/4 of container of Philadelphia Cooking Creme Santa Fe Blend
Add 1/2 cup of shredded Mexican blend shredded cheese
Mix in shredded chicken
Spoon a small amount of mixture in a 6 inch tortilla (we used 8 inch ones just because)
Wrap and put the folded side down onto a baking dish
Continue until baking dish is full or all of the mixture is gone (we ended up making eight 8 inch tortillas full)
Spread remaining 1/4 of container of Philadelphia Cooking Creme Santa Fe Blend on top
Sprinkle a little cheese.
Place in a 350 degree preheated oven until warmed through and cheese is melted (20 minutes for us)
Then EAT!!!
Thursday, January 27, 2011
My Grandfather's83rd Birthday, His Bible Cake and a Home Made Fondant Recipe
I have been making "fancy" cakes for about 2 years. I like to make my own buttercream and fondant and experiment with recipes. I have made my daughters' birthday cakes and a few for my brother and husband. I made two cakes for my uncle's birthday back in August and my aunt asked me if I would make my grandfather's cake. He just turned 83 January 25th. We had his birthday dinner at my mom's after church this past Sunday.
When I make a cake I use various recipes. For this cake I made two batches of a basic white cake but added some fresh shredded coconut and almond extract to the batter. I made two square cakes and then trimmed them to look like 1/2 of a book. I then put them together. I then freeze the cakes overnight so they are easier to carve/ butter cream.
The cross is made from gum paste (which I have not yet mastered) so I purchased it white at our local cake supply store.
The butter cream recipe stays the same each time. 5 sticks of butter
The last step is to leave as plain butter cream or flavor it. I flavor it most of the time. This time I added a whole can of chocolate frosting (pre-made). I don't like coming up with my own chocolate to add to it, it always tastes funny. I make the butter cream from scratch but just add in extra chocolate frosting for the flavoring.
I put a smear of buttercream on the cake board to act as glue. Then I unwrapped both cakes and placed them in the center of the board. I put another layer of coconut on top of the cake and then covered the whole cake in the chocolate buttercream. A lot of it!
I cut the edges of the "book" at a slant to mimic the pages being laid down with a slight angle. I also billowed the buttercream to show the crease in the center of the book and the pages lying out from the center binding.
It was then covered in a white buttercream that I hand made.
Mini marshmallows (454 grams)
2 Tablespoons water
1. Microwave those two ingredients for one minute. Take out and stir with a wooden spoon covered in Crisco.
2. Microwave again for 1 minute stir. This time all the marshmallows should be melted and the mixture should resemble marshmallow cream.
3. Add 5-6 cups of confectioner's sugar one cup at a time. After each cup use the spoon to stir it in. The confectioner's sugar makes the mixture hard to mix and eventually after all of it is put in, not sticky.
4. Simply roll out the mixture with Crisco covered rolling pin onto a confectioner's sugar covered board or counter top.
5. Let the decorating begin!
After I covered my cake with fondant, I used gel colors and mixed in a little water to make "paint". I then used my fondant tools to smooth out the cake and create lines in the side to make pages.
I used a thin mixture of ivory gel and water to create an "antique" look to the pages. I then used a thin tip of my tool to "write" the words of the Bible verse onto the left. I filled in the creases the tool made with blue gel mixed with water.
I then cut out leaves from fondant with a leaf punch, used my tools to create a veining effect and painted them with a mixture of green and brown gel and water. I then used a little water to "glue" them to the cake. I used a gold gel writer to write the gold lettering on the cake. I finished it off by "dusting" the entire cake with edible glitter. I accidentally smeared two spots because it wasn't fully dry. :( but I tried to cover it up as best as I could. Here is the final product.
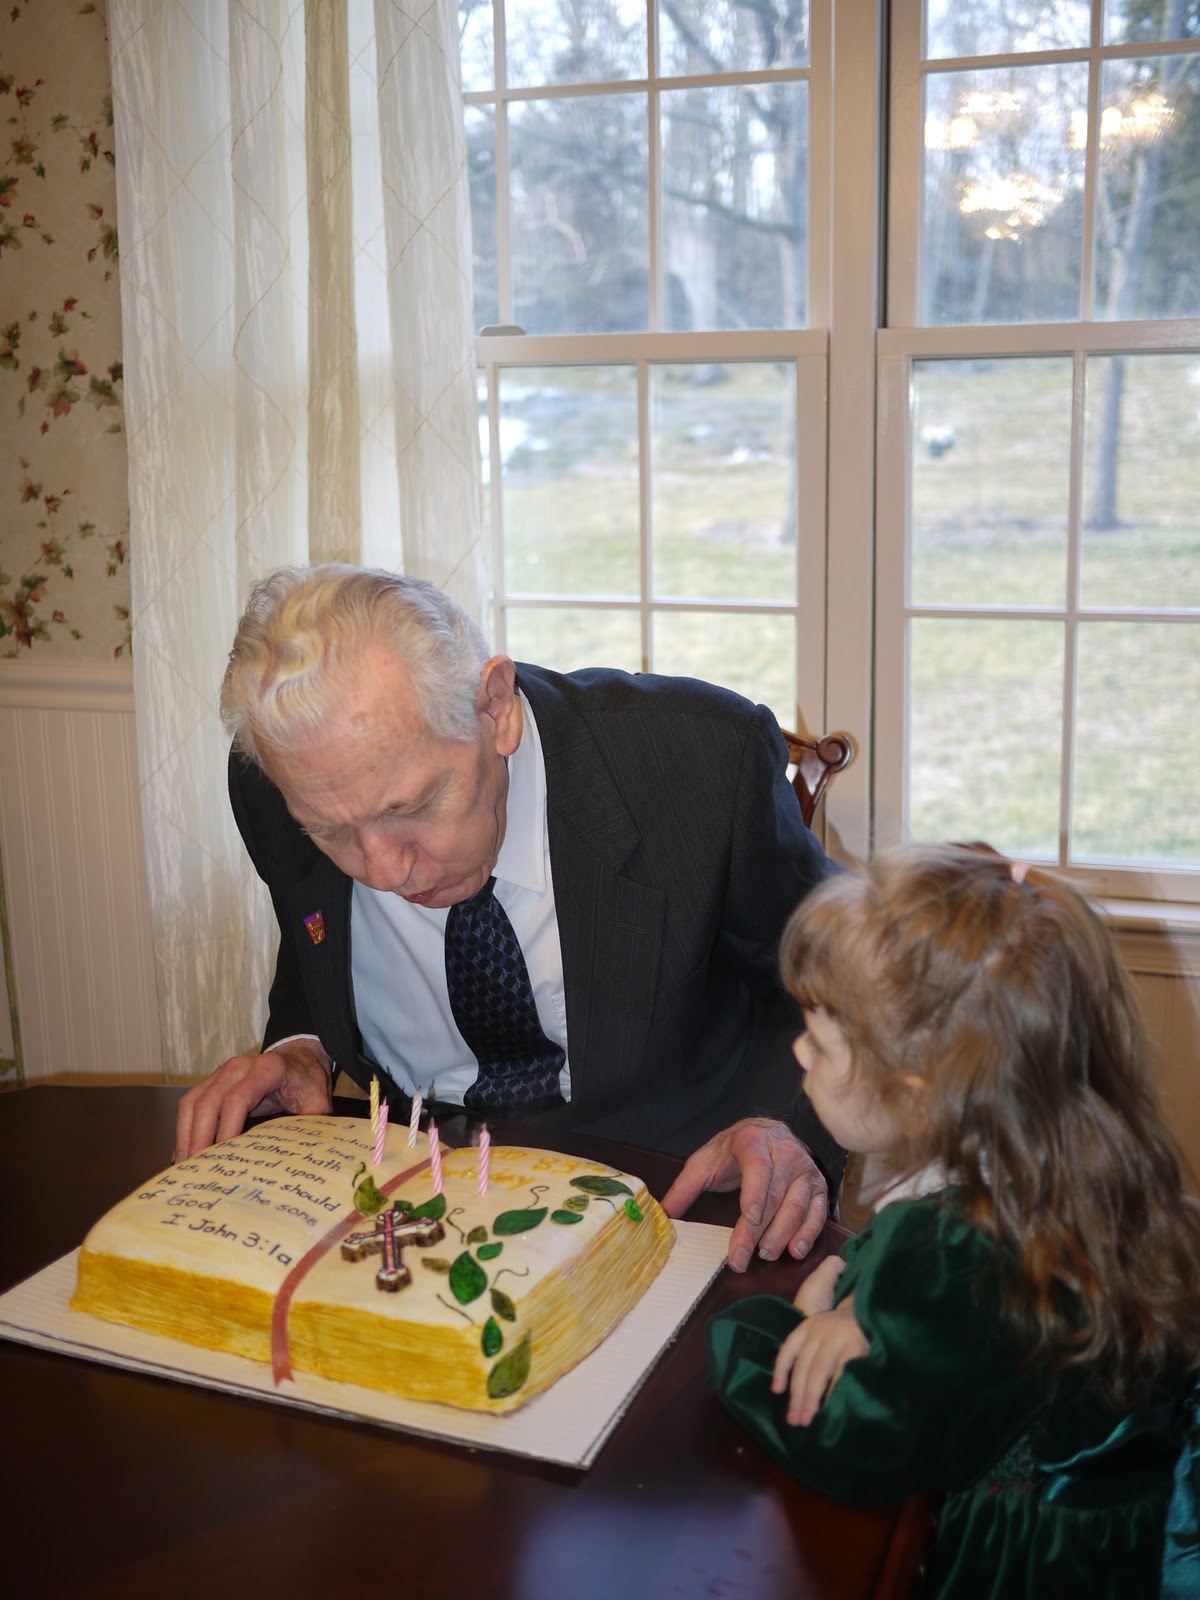
My youngest decided to help Grandpa blow out his candles. We even relit one for her so she could blow it out.
When I make a cake I use various recipes. For this cake I made two batches of a basic white cake but added some fresh shredded coconut and almond extract to the batter. I made two square cakes and then trimmed them to look like 1/2 of a book. I then put them together. I then freeze the cakes overnight so they are easier to carve/ butter cream.
The cross is made from gum paste (which I have not yet mastered) so I purchased it white at our local cake supply store.
The butter cream recipe stays the same each time. 5 sticks of butter
The last step is to leave as plain butter cream or flavor it. I flavor it most of the time. This time I added a whole can of chocolate frosting (pre-made). I don't like coming up with my own chocolate to add to it, it always tastes funny. I make the butter cream from scratch but just add in extra chocolate frosting for the flavoring.
I put a smear of buttercream on the cake board to act as glue. Then I unwrapped both cakes and placed them in the center of the board. I put another layer of coconut on top of the cake and then covered the whole cake in the chocolate buttercream. A lot of it!
I cut the edges of the "book" at a slant to mimic the pages being laid down with a slight angle. I also billowed the buttercream to show the crease in the center of the book and the pages lying out from the center binding.
It was then covered in a white buttercream that I hand made.
Mini marshmallows (454 grams)
2 Tablespoons water
1. Microwave those two ingredients for one minute. Take out and stir with a wooden spoon covered in Crisco.
2. Microwave again for 1 minute stir. This time all the marshmallows should be melted and the mixture should resemble marshmallow cream.
3. Add 5-6 cups of confectioner's sugar one cup at a time. After each cup use the spoon to stir it in. The confectioner's sugar makes the mixture hard to mix and eventually after all of it is put in, not sticky.
4. Simply roll out the mixture with Crisco covered rolling pin onto a confectioner's sugar covered board or counter top.
5. Let the decorating begin!
After I covered my cake with fondant, I used gel colors and mixed in a little water to make "paint". I then used my fondant tools to smooth out the cake and create lines in the side to make pages.
I used a thin mixture of ivory gel and water to create an "antique" look to the pages. I then used a thin tip of my tool to "write" the words of the Bible verse onto the left. I filled in the creases the tool made with blue gel mixed with water.
I then cut out leaves from fondant with a leaf punch, used my tools to create a veining effect and painted them with a mixture of green and brown gel and water. I then used a little water to "glue" them to the cake. I used a gold gel writer to write the gold lettering on the cake. I finished it off by "dusting" the entire cake with edible glitter. I accidentally smeared two spots because it wasn't fully dry. :( but I tried to cover it up as best as I could. Here is the final product.
My youngest decided to help Grandpa blow out his candles. We even relit one for her so she could blow it out.
Subscribe to:
Posts (Atom)