Pages

Saturday, June 4, 2011

Cover Up That Gas! Building a Propane Tank Hide Away Cover

 Our homeowner's association has some very strict rules for things including but not limited to:
1. only a 4 foot fence can surround your house.
2. NO sheds of any kind
3. Any major structural changes must be approved by the architectural committee
4. All mailboxes must be the same
5. Any propane tanks must covered from street view
6. NO above ground pools
7. NO large playsets


The list goes on and on and only a few things are actually enforced at all. The mailbox thing I don't think anyone has EVER followed but when we got a propane tank 2 days before Christmas I knew it would eventually get covered. Why? Because I'm such a stickler for the rules? NOPE! Because the darn thing is hideous!
As you can tell we've been so very diligent in weeding around it. Mostly because I was scared to death that if the weed eater hit it our house would explode. I'm a little dramatic at times.

We purchased:

1 6x8 foot piece of fencing from Lowes $24.98
1 4-pack of L brackets from Walmart $1.98

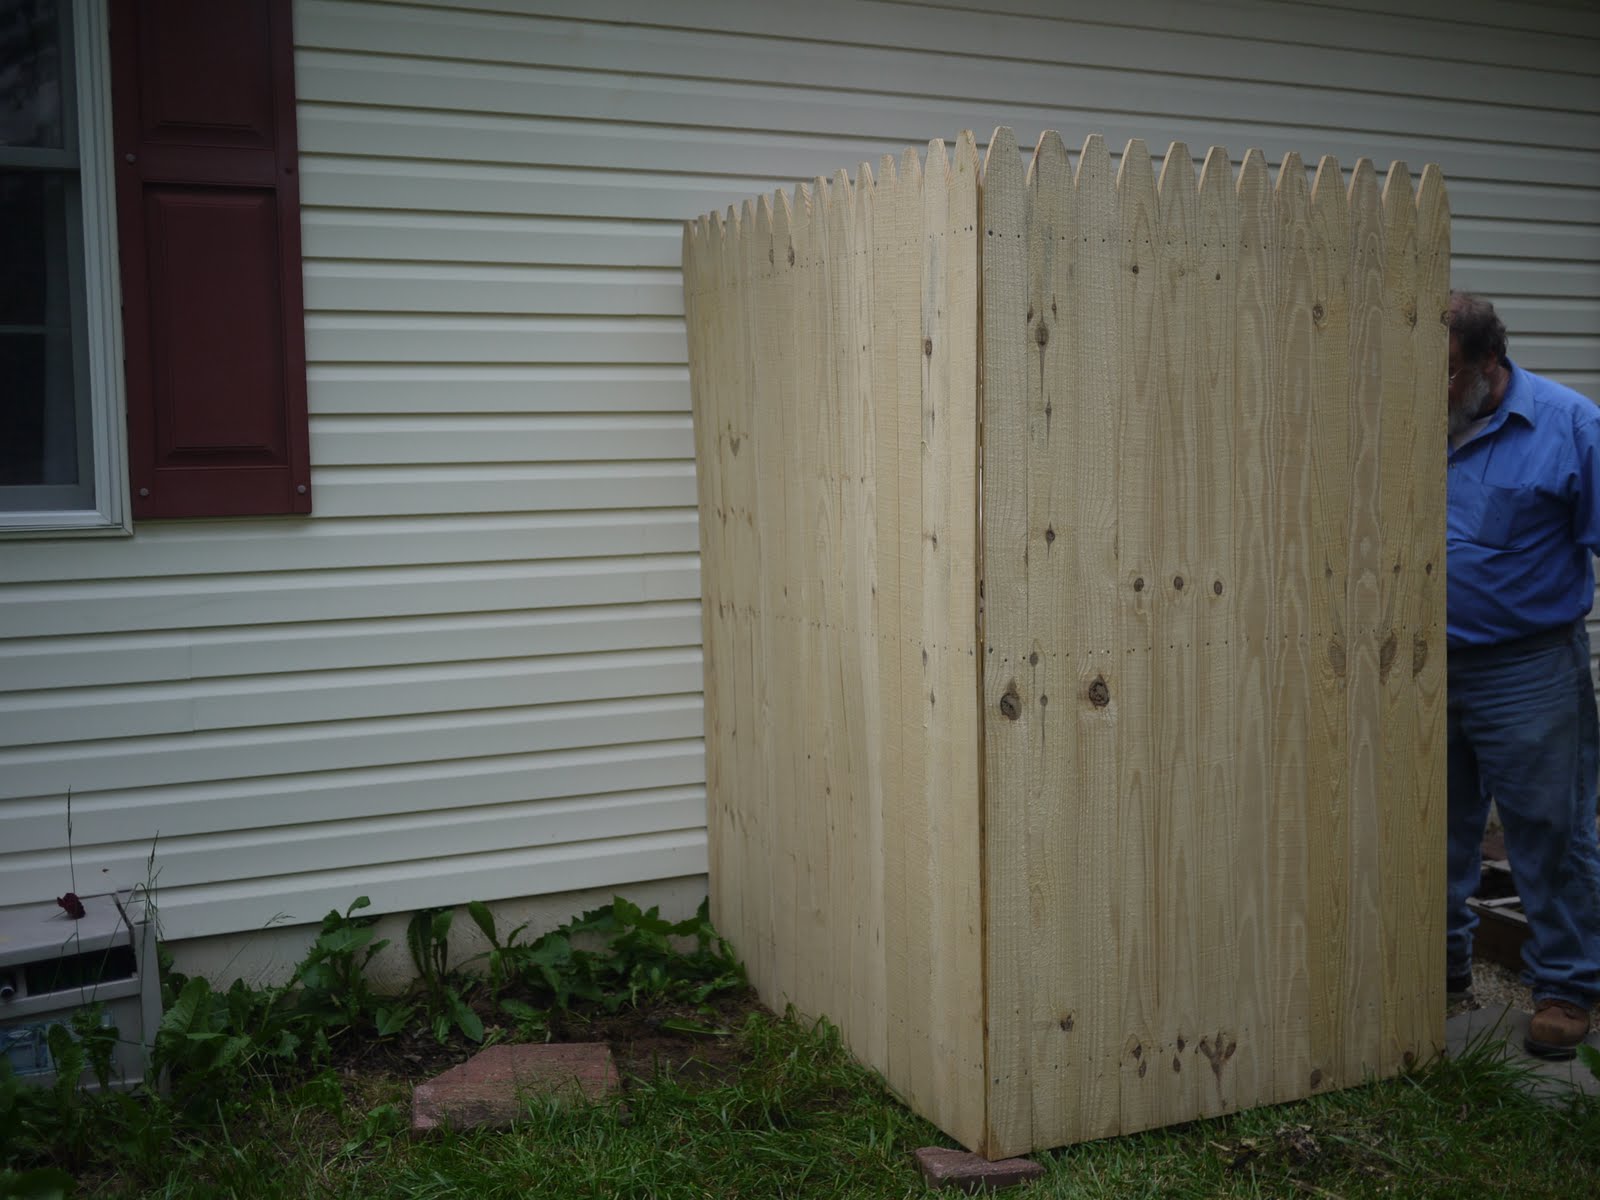
We used my father-in-law's truck and saw to bring the large piece home and then saw it into 2 pieces. The pieces were 5 feet and 3 feet. We wanted to make sure it was long enough to cover the tank but didn't stick out so far into the yard.


 Next, the metal L brackets were installed along the long support pieces of wood (3).

Then, the two pieces were held together by my husband and I while my father-in-law secured the L brackets together and reinforced with 2 inch drywall screws (I had them in my garage so they were essentially free for this project)


We then lifted the entire thing up to the propane tank and used old patio pavers to ensure it was level since our yard slightly slopes.
It has not been been attached to the house yet since I want to paint/ stain it first. But here is the finished building project. The weeds have since been pulled out.  The backyard hose is directly next to the propane tank (on the left) so we need to cut a small hole in the cover to hook up the hose. 


The hose on the left in the plastic housing will be moved up against the propane cover once the hole is drilled but for now our propane tank is covered and it gives me a blank canvas for our backyard for only $30!

Tuesday, May 24, 2011

Summer Yard Plan 2011 and the current mess it is in

Our yard is currently yucky! We bought our house 5 years ago and it looked alright as far as landscaping goes. However, there were some issues. For example, all the shrubs and plants were planted smack dab against the house so as they grew they pushed outward and hung over the mulch. We had to pull up a butterfly bush that was massively overgrown and over the 5 years we've lived here perennials have died and some of the bushes have also thinned and become scraggly.

Last year we mulched with some recycled mulch from the local recycling plant and planted some tulips and mums. This year only two mums came back up (out of 5 ugghhhh.... The tulips we planted too far apart and they just looked sad. Another two shrubs died completely and so now we are left with this.
 
The overgrown grass is where I have left it for a week and a half so we can widen our flower beds. They are very narrow right now so we are using a shovel and digging up the grass. It is very slow work. It doesn't help that it has rained almost every day for the last two weeks either.


 Here are some of the plants we currently have in our flower beds. This is an overgrown rose bush that I hack at every year and it keeps coming back even bigger!
This is a black eyed susan I got from my cousin's house after he died. My mother dug up two and gave me one when we moved into this house. He died of cancer two weeks after our oldest child was born. It is planted directly below her bedroom window.

This next one is a raspberry bush my husband and I planted last year. I know it is currently out front but it will be moved to the back inside a large planter when I move things around. It was just a stick last year so this is great progress!
This beautiful climbing vine I can't remember what it is called, but I planted one three years ago and it keeps coming up!
Here is the progress so far. We've left the grass grow in the area we want dug up and I have started digging. It has been extremely slow progress especially since we are also working on the kitchen and other things at the same time.
The picture does not do my hard work justice. This is actually about a 3 1/2 to 4 foot stretch but I took the picture from the porch so it looks a little wonky. Don't want to miss credit for my work! :o)

Here is the general plan for our yard this year. We have already accomplished the covering for the propane tank and I'll tell you about that later.

Monday, May 16, 2011

The Evolution of a Granite Kitchen Counter top

We began our journey to a granite counter top in March of this year. We went to Home Depot and Lowes and researched prices and colors. I originally wanted Carerra Marble but hubby told me no it would crack too easily. So... I wanted a light color but one that would work well with light off-white or white cabinets and a darker hardwood floor (when we eventually install it). 

We ended up picking this:

The granite has very light off white and clear crystals with some silvery sparkly ones with a some black. We thought it would be a great balance with the very light cabinets we were going to paint but not be too dark either.

The next step was to have the Granite man come and measure. He measured and then we drove an hour 1/2 away to pick out our actual slab. The girls had a blast!
Next we went back into Home Depot and finalized all the details.

Then we waited for the stone company to call us with our date and then we waited. About 3 weeks total. Last night and well ALL day Sunday, hubby and I worked on our kitchen to rip out the old counter top, sink, and ensure all cabinets were level.

This afternoon, the men brought our pretty stone out and installed it. We have since put the stove and fridge back and I have started in on the faucet. We are not really supposed to "use" the counter for 24 hours so we will finish installing the kitchen plumbing and the dishwasher tomorrow after school.

We have not finished the cabinets, floor, back splash, or purchased new appliances but one day this kitchen will be 100% finished. Probably not until next year but I'll go with what I can.


The kitchen cabinets are going to be done in Rustoleum's Cabinet Restore in a Linen with a light glaze while I think we may do an off-white subway tile as a back splash.

Finished pictures should be up end of June or beginning of July.  We do things in steps. The floor will not be done until end of the year or next spring. :o(

Friday, April 29, 2011

Easy Preservative Free Home Made Chicken and Rice Soup


My family loves this soup so much I've made a huge batch twice this month!

3 cups of shredded cooked chicken
2 cups of dry rice
3 cups of water
1 large box of low sodium chicken broth
3 tablespoons parsley
3-4 large carrots chopped
3-4 large stalks of celery chopped

1. Cook rice in 3 cups of boiling water. We use minute rice.
2. Do not drain rice but add 1 large box of low sodium chicken broth.
3. Add cooked chicken, chopped carrots and celery.
4. Add parsley, salt, pepper and any other seasoning to taste. We just add parsley, salt and pepper.
5. Cook on medium for 10-15 minutes until carrots and celery are tender.
6. Take off heat and serve.

This makes 4-5 huge bowls of it. If you let it sit for a while it will turn into more of a chowder as the rice will absorb more of the liquid. You can add more water or chicken broth in the beginning of the recipe if you want more broth.

*I took this picture the next afternoon when I reheated it for lunch. The original batch was much more "soupier". You do not need to add extra chicken broth or water if you eat this right away.

Friday, April 22, 2011

#Home Depot: Picking Out Our Granite... and the girls' field trip to the warehouse


This is the sample of the granite slab we picked out at Home Depot back in March. I have carried this little piece of granite in my purse for a month. Why? Why not?


The girls were both so excited to pick out our granite slab for the kitchen counters. We went Thursday morning and picked out the slab in Jessup, Md which is 1 hour and 45 minutes from us. We measured ourselves and picked the color and paid back in mid-March and the actual granite people could only fit us in to measure professionally this week. They measured Wednesday and Thursday we took our road trip. The picture above is just one of the aisles inside the warehouse. We saw some awesome pieces and some funny ones. We'll show you in just a bit.

 Here is a close up (pardon the flash and the reflection of the lights above).  What we chose is called Azul Platino from Spain. Contrary to the name there is NO blue in it. There are specks of white, black, clear, a look like stainless steel and just a hint of pale green. No blue. Someone was color blind.
Honestly though, this wasn't my first choice. I really wanted Carerra Marble after my idol Sarah Richardson, but alas. Marble isn't as strong as granite and the sales lady said it would stain easier. Hence, my husband said no way. Below is my beloved marble. :o(  I may get him to agree to a master bath vanity in marble. Maybe.... that's at least a year in the future so I have time to soften him up.

Here are some interesting things we saw. I don't know what this one is actually called but Emma said it looked like raw meat with snot in the middle. The mind of a 6 year old.
 This one was so neat! It actually looked like it swirled around almost like water. You can't really tell from the picture though.

This one looks like and feels like a tree. It is completely textured. I have no idea where you would use this because it was so bumpy a pot or pan would not be able to sit level at all.


 Two very excited girls who LOVED seeing all the "pretty rocks".
 A beautiful slab made from amethyst (my birth stone).  They had it lit up from beneath to show you could install it that way I guess.
 Blue agate slab lit from beneath. Where would you put this?
 This was brown agate. Much more variation.
 A close up of the amethyst. Isn't is beautiful? I still have no idea where we'd ever use something like this.

 Two crazy girls standing in front of our future kitchen counter top.
 Here is our actual slab. That is my brother, husband and Emma you see. Miss Eryn is in front of my husband. You can only see a small dot of her pink jacket.
 Again, my granite. We chose this one because we wanted to go with a counter that was as light as possible because we are going to use Rustoleum's Cabinet Transformations to make our cabinets white and we are painting the bulk head above the cabinets a pale tan. We aren't 100% sure what tile we are doing as a backsplash but we know it will be tile. Thus... me having a piece of granite in my purse for a month.

We go back to Home Depot either this evening or tomorrow to finalize everything and then our counter will take 1 week to be cut/polished and then they will come install. I am SO excited to have a fine counter top. I've never had anything other than laminate in any house I've ever lived in (married or as a child). 

Monday, April 18, 2011

The Easter Dresses, a Burnt Wrist and No Sleep


Let me explain this lovely title by saying there are no Easter dresses with sleeves to be found anywhere. My opinion is my own and I in no way want anyone to think that I am trying to say everyone should do as I do. However, our church believes that there should be sleeves in clothing for both men and women combined and I grew up always wearing at least short sleeves.

With that said, I cannot find Easter dresses that have anything more than tank top sleeves. I know you can buy shrugs, etc to cover up the sleeves and Emma has done that last year as well as Eryn. But.... the now 3 1/2 year old hates anything she thinks is a jacket and tears it off immediately. It doesn't help that church is always freezing and Eryn is currently sick.

So, with all that in mind I set out to make the girls' Easter dresses this year. Of course, they picked out the fabric and I still have all week so I might make a second set and we'll vote on which ones get worn Sunday morning. I'm not a huge fan of this fabric as it is extremely bright but at $2.00 a yard and the girls' best pick I said yes.
Here is the carnage of my table. No that isn't my telescope, Emma tried to see the stars but it was too cloudy so it ended up on the kitchen table for some reason or another. I purchased a bunch of patterns off of Etsy and tried to make Emma's dress first. Here is the pattern and scrap carnage on my table.
First thing that happened was I turned on the iron to press the fabric as I sewed. Less than 1 minute later I accidentally brushed against it and burned my wrist pretty bad.
Here is the dress after I finished most of it Friday night, very late so not much sleep. Also, with Eryn being sick I haven't slept much because she hasn't slept much. Therefore, I am in great need of a nap. I hung it my bathroom on the hook so Eryn wouldn't see it since it was Emma's dress.
Sad part happened when Emma tried it on Saturday morning only to discover it was too small. It seems the pattern I purchased didn't have the measurements right. Emma is a size 10 and I made a 12 just to be sure she had some wiggle room. Following the pattern precisely made it just a hair too small. So.... I altered it to fit Eryn and finished it for her. Here is Eryn now wearing the same dress after I changed it a bit and added her black lace, sleeves, button, pocket and oh yeah, hemmed it too.

Tuesday, April 12, 2011

Great Giveaway at Win, Lose, or Blog + Week 1 Results

The week 1 totals are in for weight loss and I'm in at number 3! With 9 pounds gone in week 1 I lost a total of 3.6% of my body! It is crazy to think in terms of that much of my total body but I'm loving it!

Win, Lose, or Blog is hosting a giveaway for Jessica Smith who does 10 Pounds Down and Look Better Naked DVD's.  The giveaway is for a downloadable 10 day meal plan from Jessica herself!


Click HERE to enter at Win, Lose, or Blog!

Also, Jessica has an amazing giveaway at her site. Click HERE to enter her giveaway as well!

LinkWithin

Related Posts Plugin for WordPress, Blogger...